Installing Frigate NVR on Proxmox in an LXC Container
Full install of Frigate NVR on a Beelink S12 Pro running Proxmox and using a Debian LXC container.

I have had some comments on my Youtube channel talking about how hard it is to install Frigate. It really is not that hard. The complexity comes in to play when dealing with optimization settings. There is lots of documentation on the Frigate NVR website that gives examples for many different environments.
I'm going to cover installing Frigate on a Beelink S12 Pro running Proxmox and using a Debian LXC container.
Be sure to watch my video on this topic.
First things first. You need to either install a fresh container or have a Debian container already installed. I will assume that if you are reading this and you are running Proxmox, you understand how to do that. I'll cover it at a very high level.
Click the Create CT button on the top right of the Proxmox interface.

I am going to create an unprivileged container, give it a hostname--in this case Frigate2, and supply a password.

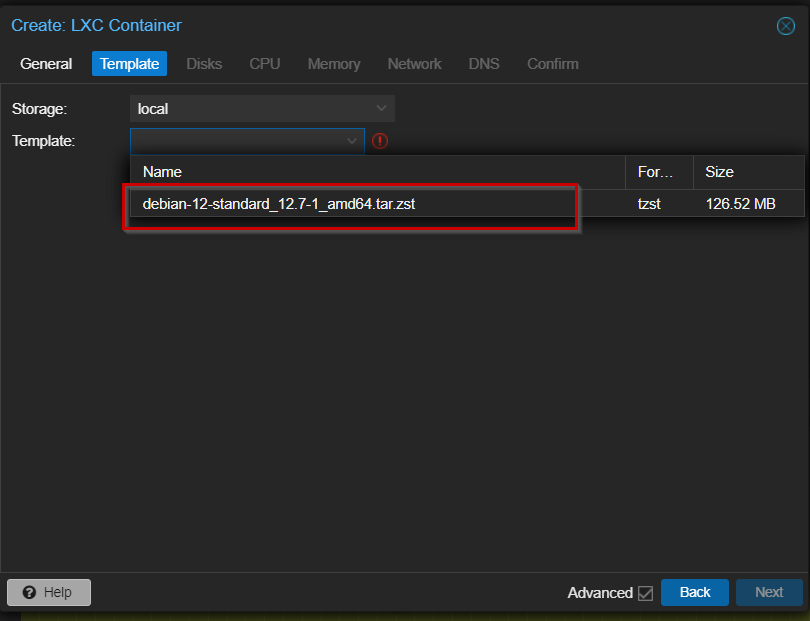
On the next screen, select your template. I'll be using debian-12-standard for this install. You might have different templates depending on how you have your Proxmox set up. Debian is the recommended OS.
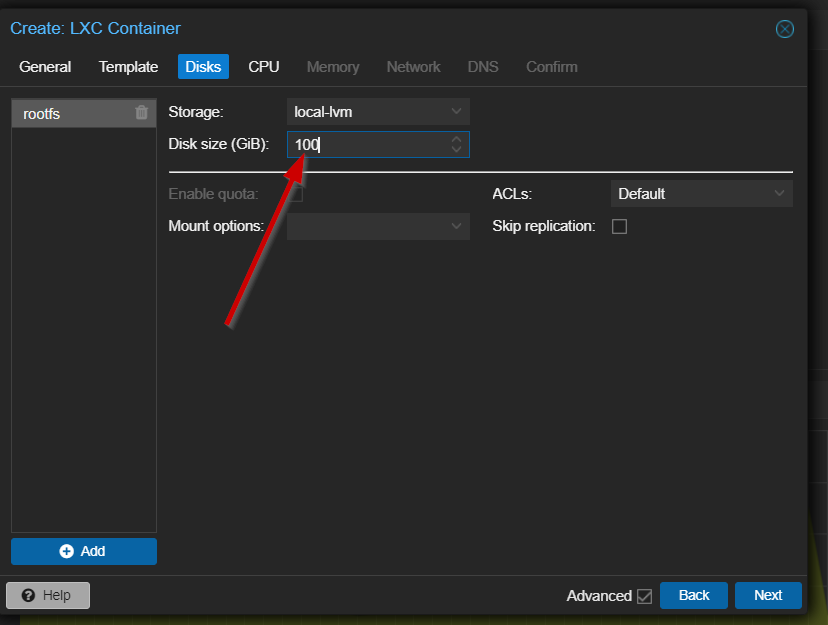
Click next and choose your disk size. Since we will be recording events from the cameras, I'm going to give this 100G of space.
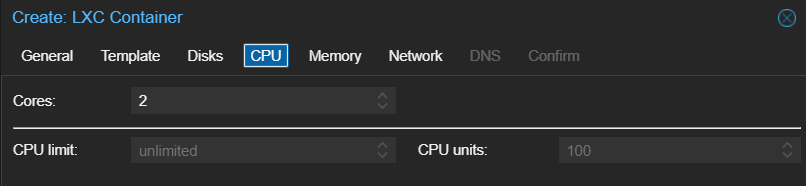
In the next two screens, I will choose 2 CPU cores and 2GB of memory.

Since this is a device that you want to access via web browsers or app, you will likely want a static IP address so set that in your network settings page. If you are using IPv6, set that as well if you want.

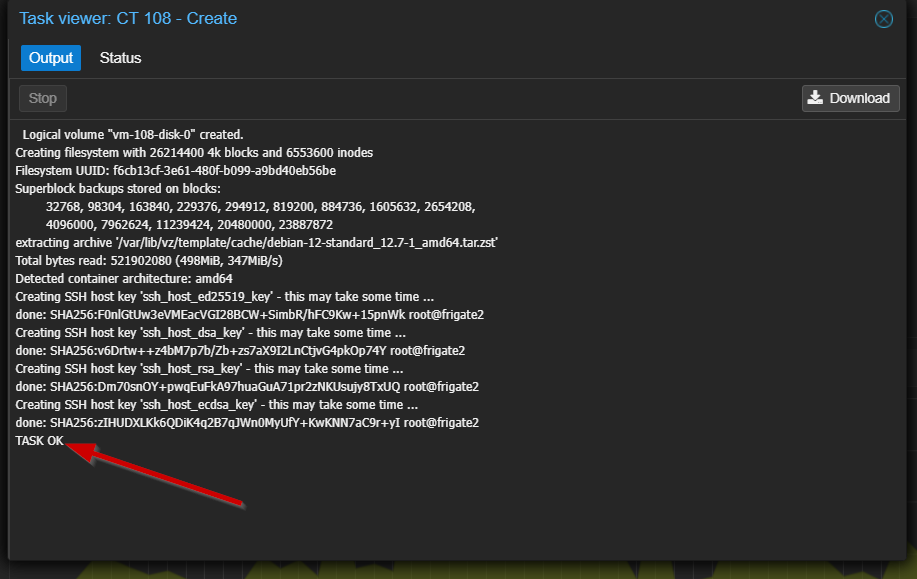
Set your DNS settings on the next screen and then on the final screen, verify all your settings and click the Finish button to create the container.

Once you get the "TASK OK" line, the container is built.
Before starting the container, you need to map a resource from the host to the container so that you can use hardware acceleration. If you aren't going to use hwaccel, then you don't need to do this. However, it is highly recommended.
This can be tricky and depends on your environment. For the Beelink S12 Pro, you need to map the following device.
/dev/dri/renderD128
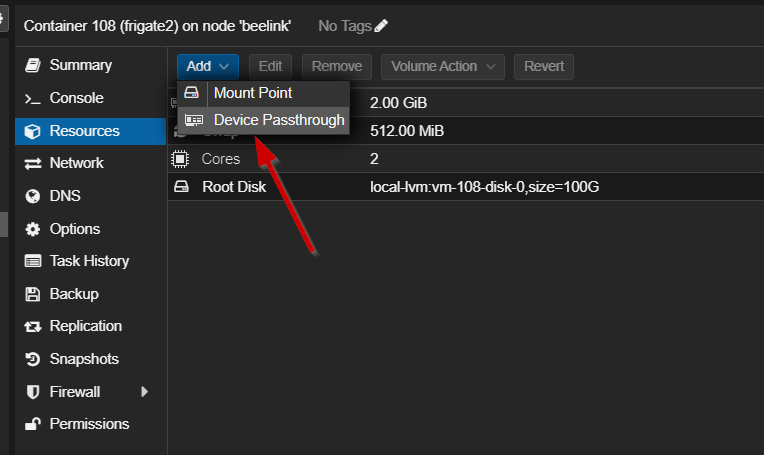
Once you have that mapped, start the container and open a console.

After starting the container and opening a console, there are some prerequisites you need to setup for security and ease of use. First, update the OS and install sudo. These commands assume you are logged in as root which is the default for an LXC container.
apt update && apt install -y sudoI created the user frigate and then added that user to the sudo group.
useradd -m frigate
passwd frigate
usermod -aG sudo frigate
Set up passwordless sudo for the frigate user.
echo 'frigate ALL=(ALL) NOPASSWD:ALL' | sudo tee /etc/sudoers.d/userLog out and then back in as the new user to activate all the changes.
Once logged back in, update the OS and system.
sudo apt update && sudo apt upgrade -yFollow the official Docker install and post user setup in order to run Frigate in Docker.
- Install Docker Engine (not Docker Desktop) using the official docs. Follow the steps in the Install using the apt repository section.
- After completing step 1, add your user to the docker group as described in the Linux postinstall steps.
When you first run Frigate, it will create a directory structure for you. However, if you want to do this yourself instead, you need to create a config and storage directory and then create a blank docker-compose.yml file. Run this in the directory you want frigate files to be stored in.
mkdir storage config && touch docker-compose.ymlHere is the default docker-compose file contents. Put this in the newly created docker-compose.yml you created in the above step.
version: "3.9"
services:
  frigate:
    container_name: frigate
    restart: unless-stopped
    stop_grace_period: 30s
    image: ghcr.io/blakeblackshear/frigate:stable
    volumes:
      - ./config:/config
      - ./storage:/media/frigate
      - type: tmpfs # Optional: 1GB of memory, reduces SSD/SD Card wear
        target: /tmp/cache
        tmpfs:
          size: 1000000000
    ports:
      - "8971:8971"
      - "8554:8554" # RTSP feeds
Start up the Frigate container. You can use the -d flag to put the process in the background or you can run without the flag to see what is happening on first start.
You will also need to grab the initial password from the logs so you can log in. If you are running in the foreground, the password will be available on the screen. If you ran with the -d flag, you will need to check the logs.
docker compose up -d
docker logs frigate
According to the Frigate documentation, you should now be able to do the rest of the configuration via the UI. However, when I try to load any pages in the UI it doesn't work. The only way I have found to solve this (as of this writing) is to go back into the shell and add a working camera to the config file.
Here is a VERY basic config file that gets things working in the UI. I am running Amcrest Turret cameras. Not all cameras are the same and each has its own URL for access. You will need to find the correct one for your camera. Start here to see the list of different camera RTSP connect URLs.
mqtt:
  enabled: false

cameras:
  driveway: # <------ Name the camera
    enabled: true
    ffmpeg:
      inputs:
        - path: rtsp://user:password@172.31.10.21:554/cam/realmonitor?channel=1&subtype=1
          roles:
            - detect
        - path: rtsp://user:password@172.31.10.21:554/cam/realmonitor?channel=1&subtype=0
          roles:
            - record
      output_args:
        record: preset-record-generic-audio-aac
    detect:
      enabled: false # <---- disable detection until you have a working camera feed
version: 0.15-1
Once you have a working setup with a single camera, it's time to talk about hardware acceleration. This is an important step to make the most of your hardware. As a reminder, I am using a Beelink S12 Pro that has an integrated GPU.
Add the following to your docker-compose.yml file and restart the container.
devices:
  - /dev/dri/renderD128:/dev/dri/renderD128
You will need to add the hwaccel_args line to your camera configs as well. Again, this is dependent on your hardware. I'll be setting it based on my hardware. There are docs for the hardware acceleration here. Add the line, save a and restart Frigate via the UI.
cameras:
  driveway:
    enabled: true
    ffmpeg:
      hwaccel_args: preset-vaapi
Now that you have a working camera and working hardware acceleration (if applicable for your setup) it is time to set up a detector. There are a number of options for detectors as well, but I will be using the OpenVINO model because my hardware supports it.
In addition to adding the detector itself, you will need to specify the model to use. There is a default model for OpenVINO that gets downloaded at docker container install so I chose to use that one for now. If you are going to use OpenVINO then add this to your config. Also remove or comment out the detect: false line and then restart Frigate.
detectors:
  ov_0:
    type: openvino
    device: GPU

model:
  width: 300
  height: 300
  input_tensor: nhwc
  input_pixel_format: bgr
  path: /openvino-model/ssdlite_mobilenet_v2.xml
  labelmap_path: /openvino-model/coco_91cl_bkgr.txt
Moving right along, now that you have a working camera, hardware acceleration, and a detector, it is time to do some actual recording. There are some specific settings you can use to tailor how and when you record and how long to keep those recordings.
Here are the settings I use for one of my cameras. This sets the camera to record on alerts and keep those for 3 days. It keeps any detections (a more advanced setup based on zones) for 1 day, and also enables snapshots and keeps those for 30 days.
    record:
      enabled: true
      retain:
        days: 0
      alerts:
        retain:
          days: 3
      detections:
        retain:
          days: 1
    snapshots:
      enabled: true
      retain:
        default: 30
The complete config file that shows all the options for recordings can be found here.
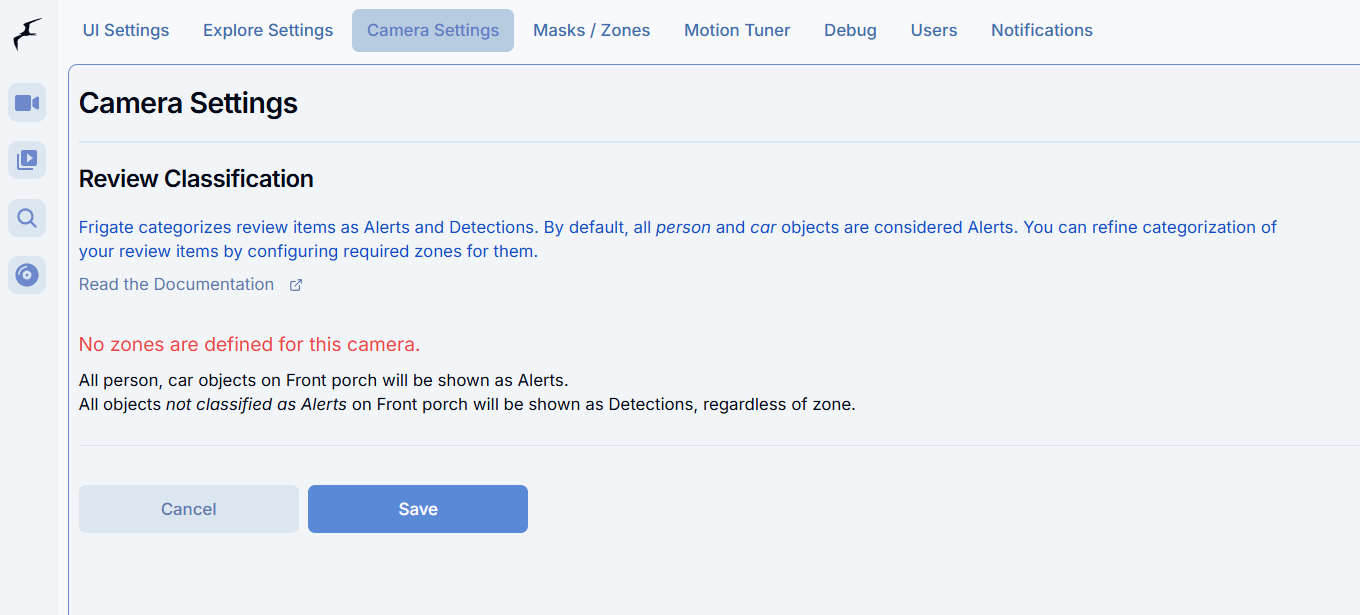
Alerts vs detections is shown on the Settings -> Camera Settings page. It requires setting up zones for your camera(s).
Here is a full camera config, including some other settings that aren't required for a very basic setup.
cameras:
  front_porch:
    enabled: true
    ffmpeg:
      inputs:
        - path: rtsp://cam_user:cam_pass@172.31.10.21:554/cam/realmonitor?channel=1&subtype=1
          roles:
            - detect
        - path: rtsp://cam_user:cam_pass@172.31.10.21:554/cam/realmonitor?channel=1&subtype=0
          roles:
            - record
      output_args:
        record: preset-record-generic-audio-aac
    detect:
      width: 640
      height: 480
      fps: 5
    record:
      enabled: true
      retain:
        days: 0
      alerts:
        retain:
          days: 3
        pre_capture: 7
        post_capture: 10
      detections:
        retain:
          days: 1
    snapshots:
      enabled: true
      retain:
        default: 30
If you want to see my full Frigate config, it's over on my GitHub page. As of this writing, that config is based on the 0.16 version and it was in beta at the time.
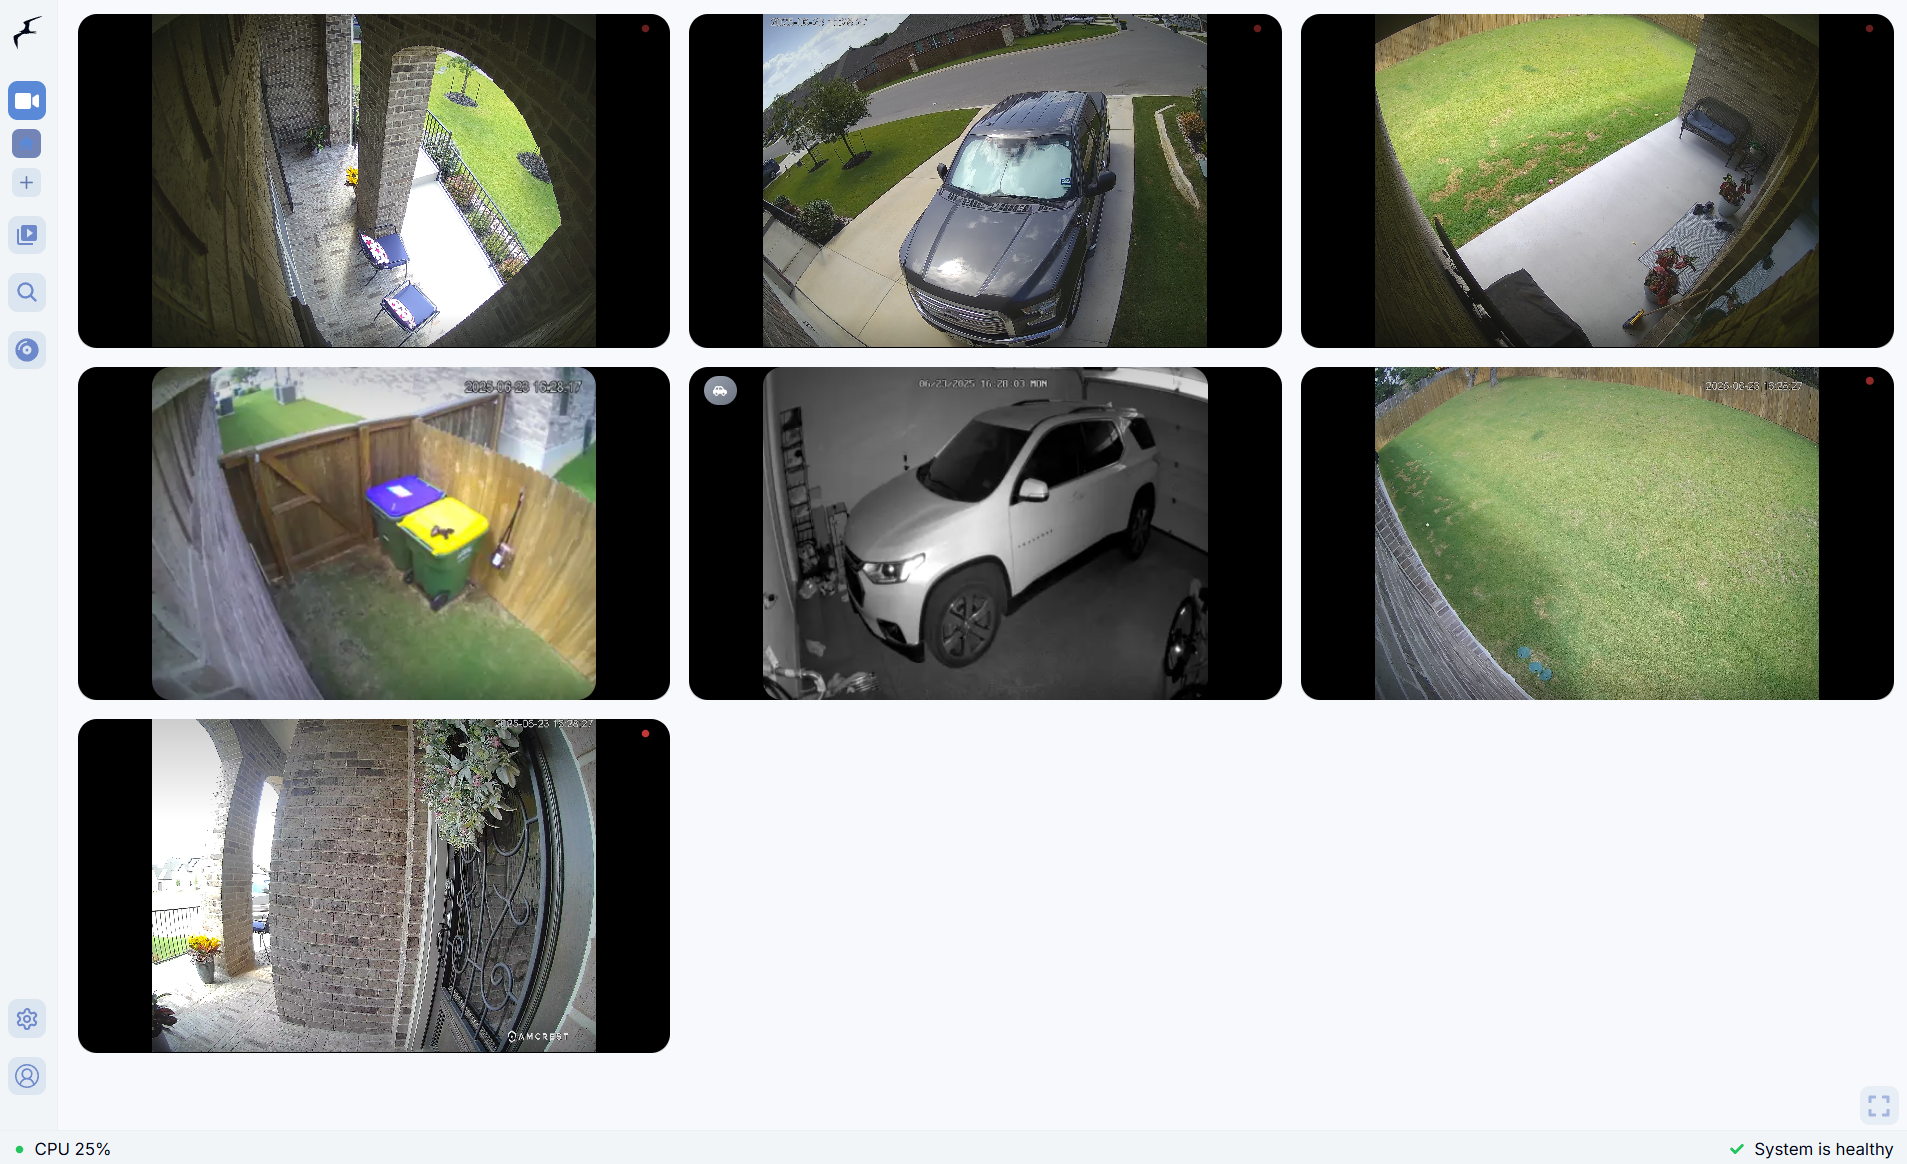
If everything went as planned, you should have a working Frigate NVR setup and be able to see your cameras on the camera page as well as see some alerts for person or car objects if they have passed by your cameras.
I added the rest of my cameras just to check the load on the server. Remember that I am using hardware acceleration to keep CPU usage low(er).
Detector Inference Speeds are good. The CPU Usage is acceptable. The Memory Usage is very good. I would say it's successful.

In summary, setting up Frigate is not hard at all. Spending some time tuning and optimizing might take a bit more time and effort. Once you have things running, it's set and forget--until you want new features. Then it's upgrade time!