
Home Assistant OS Version 10 Update
There are lots of release videos on new versions of HA and rightly so. Those releases have all the shiny new parts and the "fun" stuff. However, the OS doesn't seem to get much love, so I thought I would cover the latest release which supports some new hardware.
Before I go any farther, let me remind everyone that there are a number of methods that can be used to run Home Assistant as noted from their site:
- Home Assistant Operating System: Minimal Operating System optimized to power Home Assistant. It comes with Supervisor to manage Home Assistant Core and Add-ons. Recommended installation method.
- Home Assistant Container: Standalone container-based installation of Home Assistant Core (e.g. Docker).
There are two alternative installation methods available for experienced users:
- Home Assistant Supervised: Manual installation of the Supervisor.
- Home Assistant Core: Manual installation using Python virtual environment.
What we are talking about is the first one, Home Assistant Operating System. This is teh unerlying OS that runs all the other stuff that is layered on top. It is the method that I use and is the easiest to install. It is also the easiest to manage all the extra goodies because of the supervisor. You can install HA supervised via a manual process to gain some of the management capabilities but that falls in the advanced category.
More Supported Hardware
What caught my eye about this release is the support for new hardware. Screaming fast hardware, at least in the Home Assistant world. You should be able to run those demanding tasks using the now supported Hardkernel ODROID-M1.
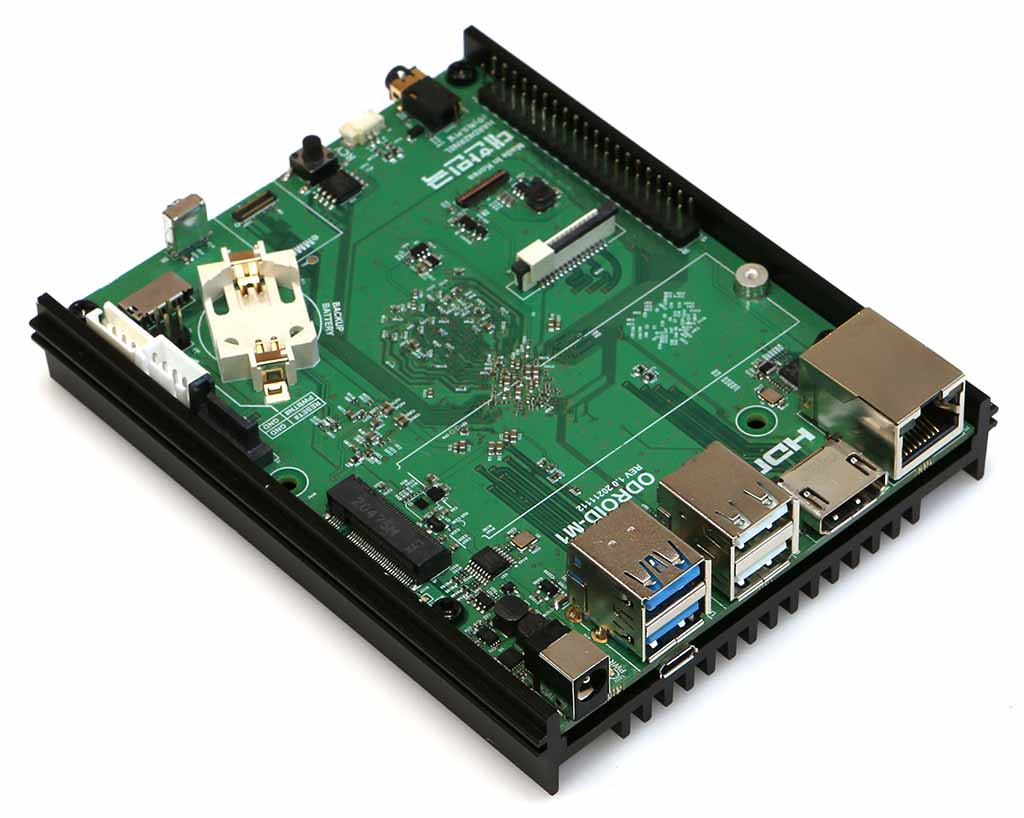
The M1 has a quad core 2GHz CPU and up to 8 GB ov memory. It supports NVMe natively. This can be used as the Home Assistant data disk but can't be used to install the OS. However, since the OS is read-only, the data disk is where all the action happens and pushing that off to the NVMe will save your SD. More on the data disk in a bit.
It is possible to boot off of the SD using the M1 bootloader. If you want to boot of eMMC, you will need to flash the Petitboot firmware after which you can flash Home Assistant OS directly onto the eMMC. More details (and caveats) in the link above.
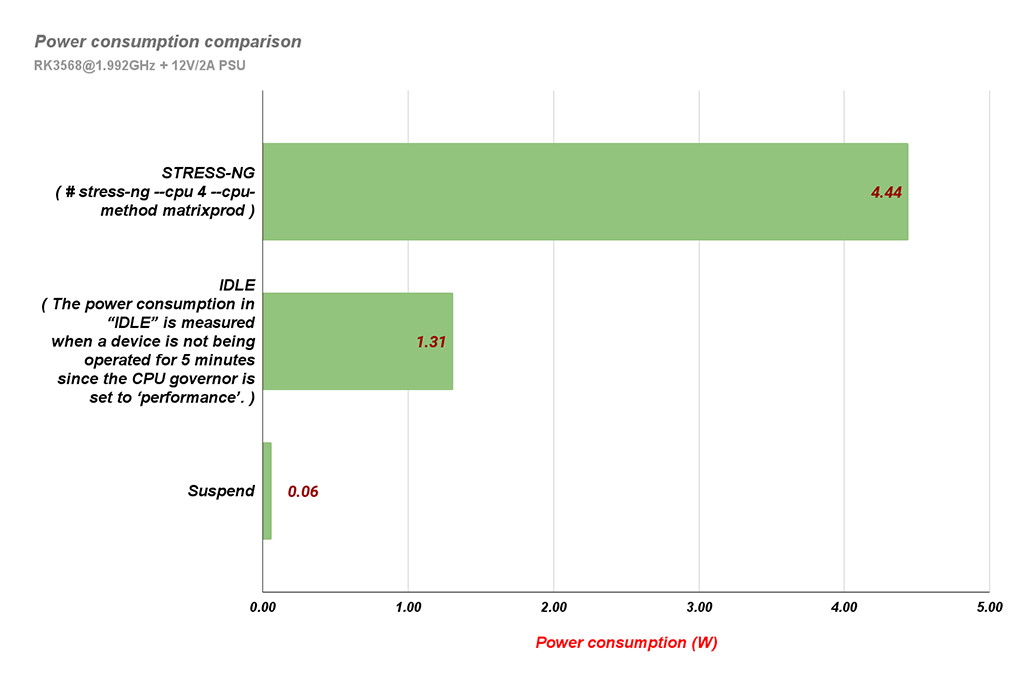
One of the things I have seen asked many times in forums is how to run Home Assistant in a more power friendly way. The M1 delivers in that category. As seen below, when the device is stressed, power consumption is around 4.4 watts (with no external devices attached). At idle, it sips a mere 1.31 watts.
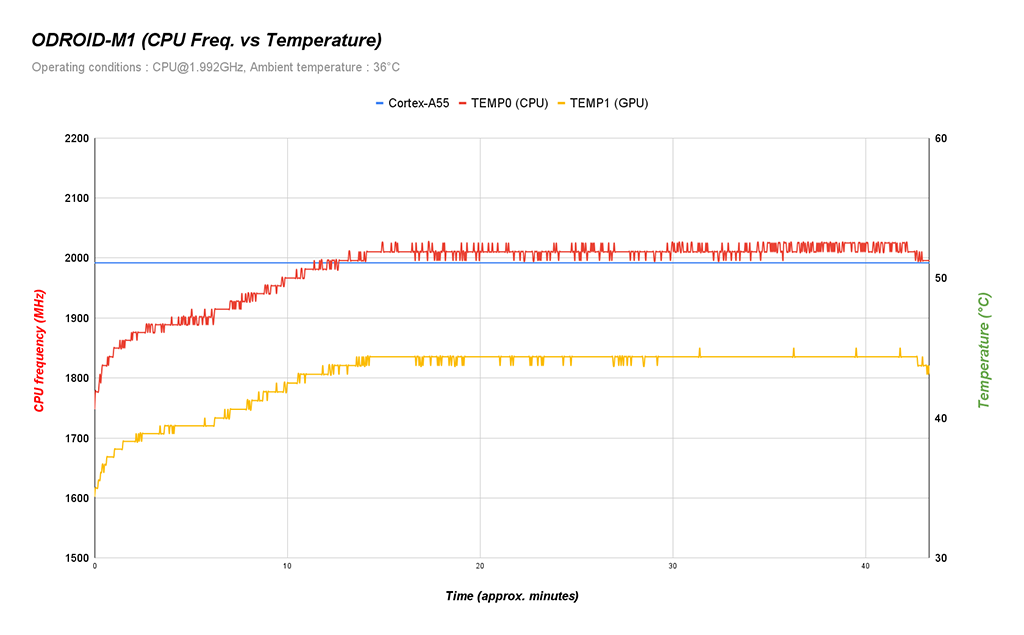
The M1 can also run heavy loads without wortying about overheating. Even in hot environments and under heavy load, the thermal trigger point is not reached. This means you can run the M1 in less than ideal locations.
At this time of this writing, you can get the ODROID-M1 4GB for $70 or the 8GB for $90. You will need to add your own power supply and of course any z-wave/zigbee/matter radios, etc.
The Data Disk
Home Assistant OS 10 also includes improvements in the data disk. If you are not familiar with the datadisk, it allows the device to send all heavy duty read/writes to an external disk. Since Home Assistant OS is read-only, moving the data disk off of something like an SD card saves lots of wear and tear on that card, which leads to fewer failures and late night "why did my x automation not run" events due to a dead HA box.
The improvements come in the form of adding the model selection to the list of availlable data disks when you plug them into your device. This helps you to more reliable identify the disks. In the past, this was problematic for some disks.
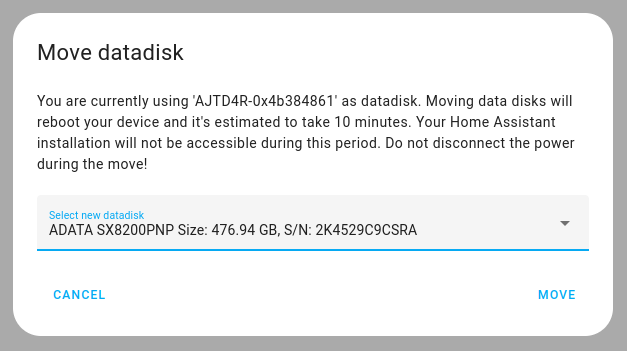
One more nice feature is the ability to move to a new data disk even after you have initially migrated to the data disk. One example might be that the data disk you first used is getting full. You can plug in a new, larger, disk and migrate from the full disk to the new one.
Memory
This version of the OS includes a new memory architecture. HA has moved from zram to zswap. This allows using storage as swap. In addition, tuning was done to reduce the number of writes to the storage space which will lead to longer disk life. The memory management has been updated to use Multi-gen LRU combined with thrashing protection, which helps HA recover from situations in which memory becomes scarce.
All of the work done with memory management is to help Home Assistant perform better in low-memory situations.
Be sure to check out the companion video to this post.