
Caddy 2 Reverse Proxy for Local Network Device Access
I've talked a lot about different ways to access devices in your local network. Cloudflare, Tailscale, Nginx Reverse Proxy, DuckDNS to name a few. In this short article, I am going to take a look at Caddy "The Ultimate Server".
Caddy claims to be "a powerful, enterprise-ready, open source webserver with automatic HTTPS written in Go". Caddy boasts quite a few features.
- Automatic TLS certificate provisioning and renewals
- OCSP stapling
- Static file serving
- reverse proxying
- Kubernetes ingress
- Runs anywhere because it has no dependencies
- Human readable and easy-to-write config file
- ....and much more
For the purposes of this article and the accompanying video, I will be using the Home Assistant Caddy 2 add-on and setting it up as a reverse proxy that allows me to access my Home Assistant Yellow and other network devices.
Adding the Home Assistant is the same as any other add-on. One additional step is to add the repository "https://github.com/einschmidt/hassio-addons" to the add-on store in order for Caddy 2 to show as an available download.
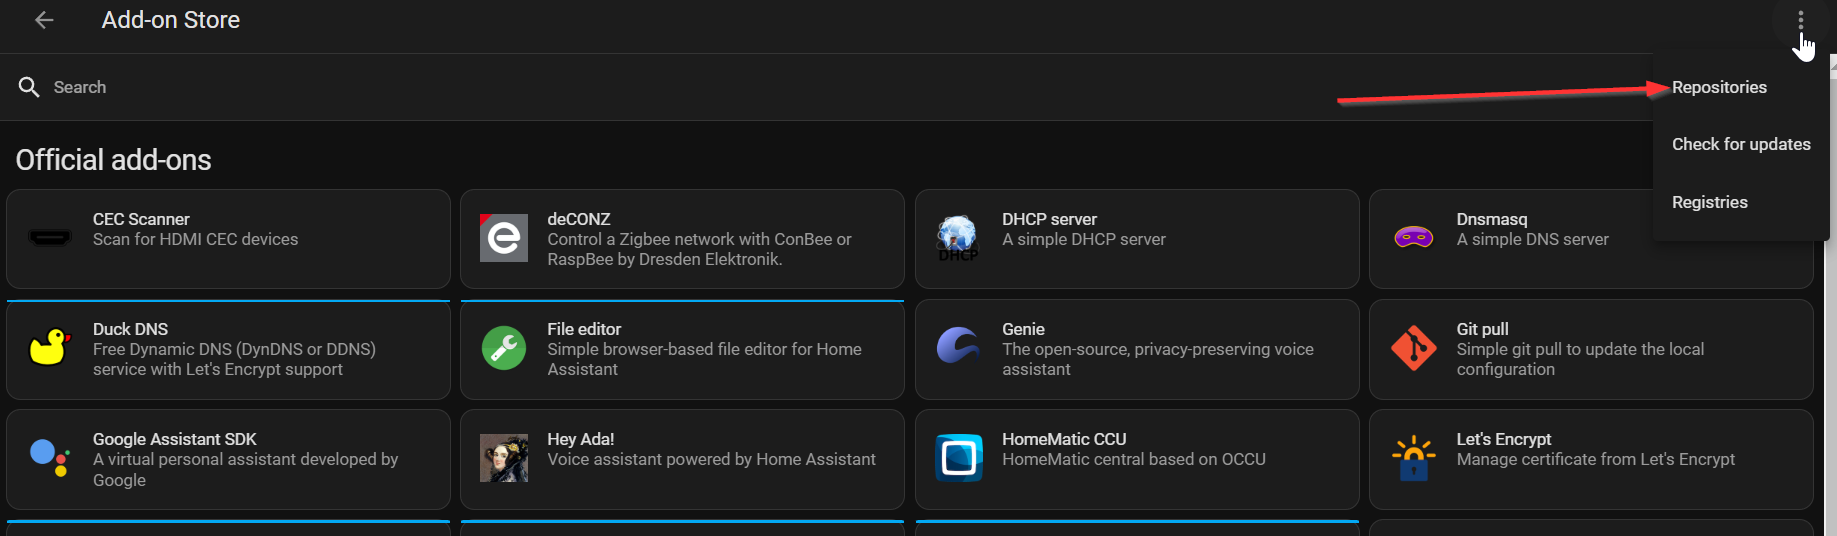
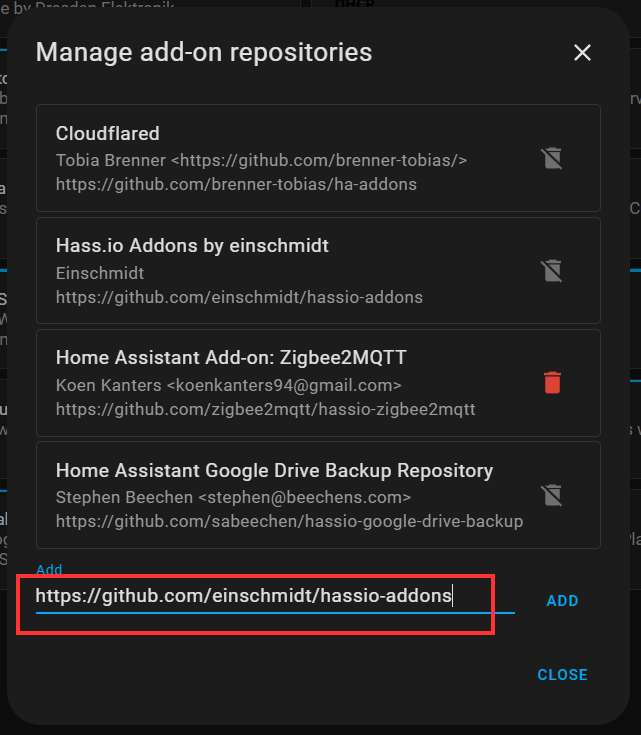
Once you have added the repository, search for Caddy 2 in the add-on store and install it (but don't start it yet). If it doesn't show up, make sure you do a hard refresh of your browser.
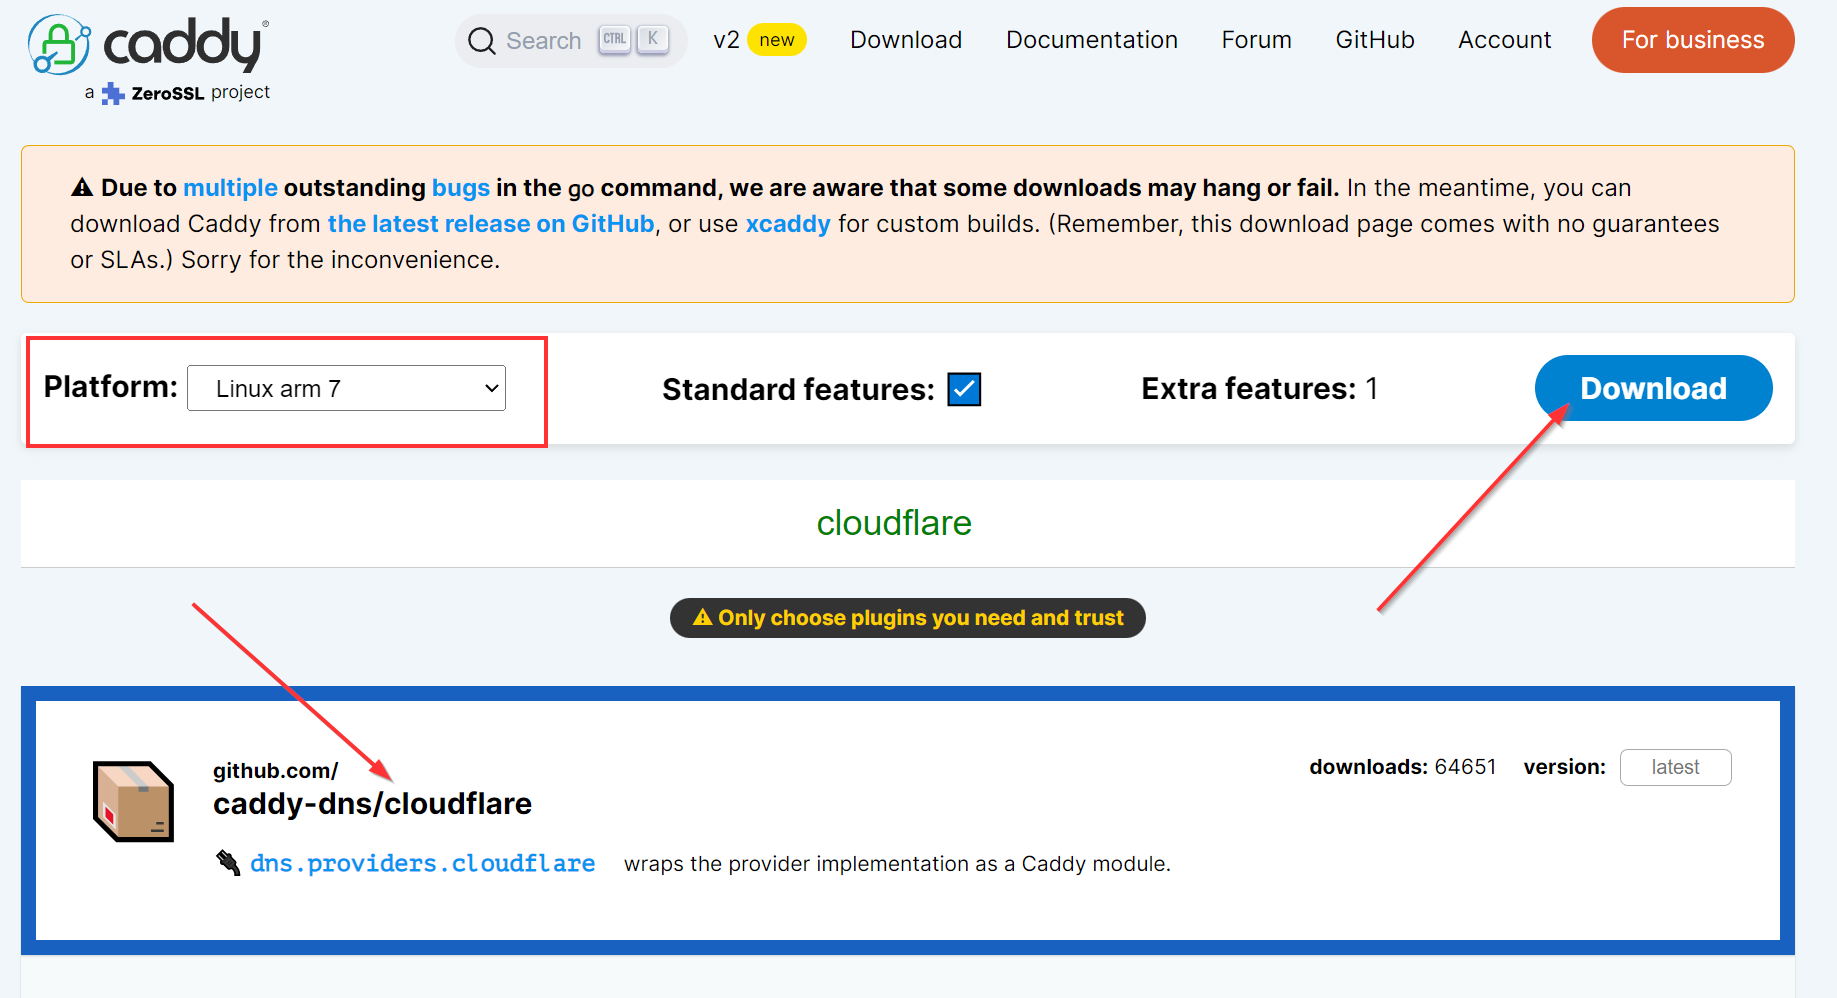
Caddy doesn't come with all the features you might want straight out of the box. You need to consider what you will be doing with Caddy. For example, I am using Cloudflare DNS and will be using the HTTP Challenge ACME protocol for provisioning certificates. The Cloudflare DNS plugin is not part of the base Caddy binary. Not a problem, though, as you can build a binary with whatever plugins you want added. Just head over to the Caddy download page and choose your system's architecture and whatever plugins you want to add. Click download and it will build your binary.
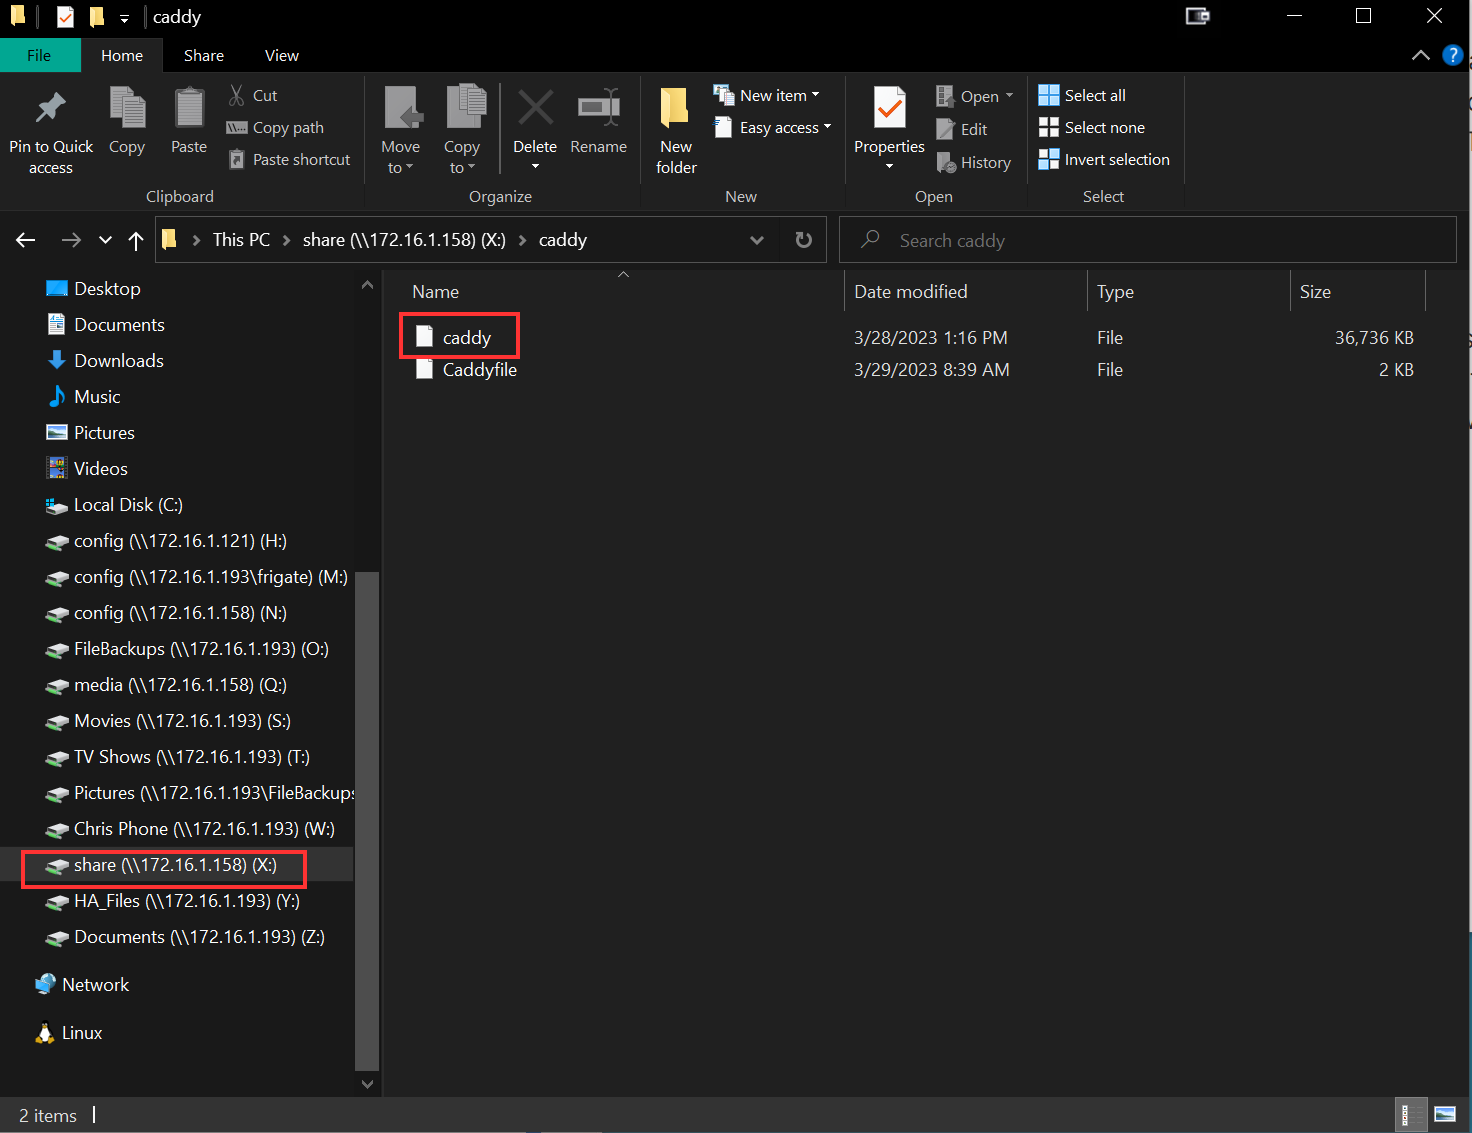
Once you have downloaded the binary, you need to put it in your Home Assistant shared caddy folder. You may need to create the folder if it doesn't exist. Your binary file must be named "caddy" and must be in the /share/caddy folder. The easiest way I found to do all of this is to add the Samba Share add-on in Home Assistant and map a drive to your local PC.
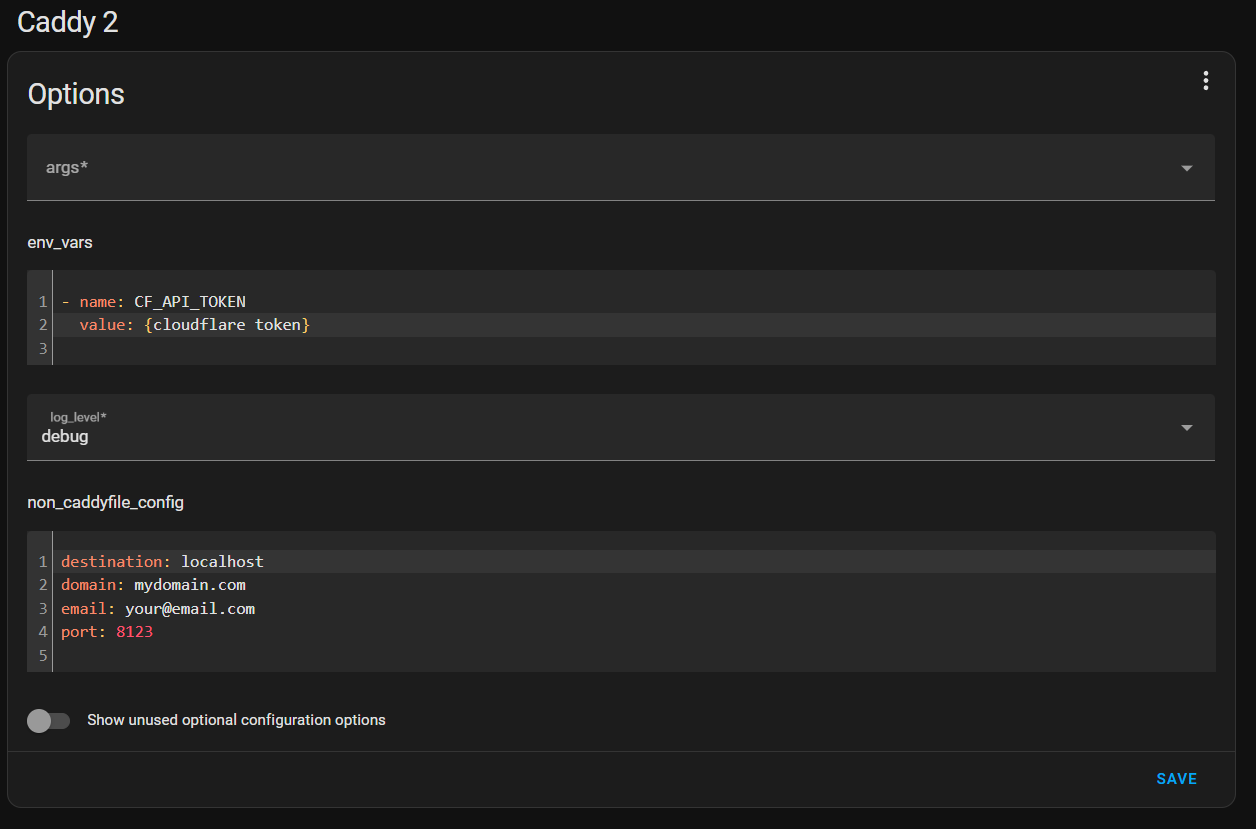
Once you have that binary downloaded and placed in your caddy folder, it's time to start configuring things. I am going to use the Caddyfile for a majority of my configuration. The only thing I am going to place in the add-on configuration is the Cloudflare token under the env_vars section. We will reference that token name in the Caddyfile. Everything else can be left as default.
The Caddyfile is the most important piece of the puzzle. It is where you will set up global as well as domain-specific settings. In the case of a reverse proxy, the Caddyfile will contain the information on where to proxy requests that hit the Caddy server. The complete config file is shown below.
{
	email myemail@myemail.com
    servers {
        trusted_proxies static 173.245.48.0/20 103.21.244.0/22 103.22.200.0/22 103.31.4.0/22 141.101.64.0/18 108.162.192.0/18 190.93.240.0/20 188.114.96.0/20 197.234.240.0/22 198.41.128.0/17 162.158.0.0/15 104.16.0.0/13 104.24.0.0/14 172.64.0.0/13 131.0.72.0/22
    }

}

(common) {
    tls {
        dns cloudflare {env.CF_API_TOKEN}
        #on_demand
	}
    header {
        Strict-Transport-Security "max-age=31536000; includeSubdomains"
        X-XSS-Protection "1; mode=block"
        X-Content-Type-Options "nosniff"
        Referrer-Policy "same-origin"
        X-Frame-Options "ALLOW-FROM *.mydomain.com"
        -Server
        Content-Security-Policy "frame-ancestors mydomain.com *.mydomain.com"
        Permissions-Policy "geolocation=(self mydomain.com *.mydomain.com), microphone=()"
    }
}

caddy2.mydomain.com:9999 {
    import common
    reverse_proxy https://172.16.1.158:8123 {
          transport http {
        	tls_insecure_skip_verify
      	}
    }
    log {
        output file /ssl/caddy/caddy2access.log {
            roll_size 10mb
            roll_keep 10
            roll_keep_for 2160h
        }
    }
}

allscan.mydomain.com:9999 {
    import common
    reverse_proxy http://172.16.1.198 {
    }
    log {
        output file /ssl/caddy/allscanaccess.log {
            roll_size 10mb
            roll_keep 10
            roll_keep_for 2160h
        }
    }
}
Let me explain the sections. First, this is the global section. It contains an email that is used to register with the CA. Also, in my case, the 'trusted_proxies static' section contains a list of IP addresses that Cloudflare uses so that Caddy knows these are trusted proxies. There is a plugin that will automatically update the Cloudflare IPs and simplifies that trusted_proxies line. However, I don't have it compiled into the binary I am using...yet.
{
	email myemail@myemail.com
    servers {
        trusted_proxies static 173.245.48.0/20 103.21.244.0/22 103.22.200.0/22 103.31.4.0/22 141.101.64.0/18 108.162.192.0/18 190.93.240.0/20 188.114.96.0/20 197.234.240.0/22 198.41.128.0/17 162.158.0.0/15 104.16.0.0/13 104.24.0.0/14 172.64.0.0/13 131.0.72.0/22
    }

}
"Common" section. I use the section for configs that will apply to more than one of my domain blocks. It prevents me from having to use duplicate code in the config file and makes for a cleaner file. I add my header settings here as well as the DNS challenge from Cloudflare. The "{env.CF_API_TOKEN}" variable is what will be referenced in the add-on configuration. You put the token in the add-on and it is used by Caddy via this variable. The headers set security policies and can be checked at the Security Headers site. With the headers below, I get an A+ rating.
(common) {
    tls {
        dns cloudflare {env.CF_API_TOKEN}
        #on_demand
	}
    header {
        Strict-Transport-Security "max-age=31536000; includeSubdomains"
        X-XSS-Protection "1; mode=block"
        X-Content-Type-Options "nosniff"
        Referrer-Policy "same-origin"
        X-Frame-Options "ALLOW-FROM *.mydomain.com"
        -Server
        Content-Security-Policy "frame-ancestors mydomain.com *.mydomain.com"
        Permissions-Policy "geolocation=(self mydomain.com *.mydomain.com), microphone=()"
    }
}
The final section contains all the sites I am proxying--in this case just two for this demo. The first line is the domain name:port. The port is what Caddy will listen on. This is the port you will need to forward from your router to Caddy. In my case, I used port 8443 externally and forward that to port 9999. Port 8443 is only a handful of ports that Cloudflare proxy will allow (unless you are on their enterprise plan). The ports can be whatever you want as long as they aren't being used elsewhere in your network, of course.
The "import common" line pulls in all that configuration from the common section. See how it makes things cleaner.
For the caddy2 site, I am proxying that to an SSL-enabled server with a self-signed cert so I need to add the transport and tls_insecure_skip_verify options, telling it to ignore the cert error.
The allscan site also uses import common but since it is being proxied to an http site, I don't need to add anything extra in the way of transport.
caddy2.mydomain.com:9999 {
    import common
    reverse_proxy https://172.16.1.158:8123 {
          transport http {
        	tls_insecure_skip_verify
      	}
    }
    log {
        output file /ssl/caddy/caddy2access.log {
            roll_size 10mb
            roll_keep 10
            roll_keep_for 2160h
        }
    }
}

allscan.mydomain.com:9999 {
    import common
    reverse_proxy http://172.16.1.198 {
    }
    log {
        output file /ssl/caddy/allscanaccess.log {
            roll_size 10mb
            roll_keep 10
            roll_keep_for 2160h
        }
    }
}
That will do it for this article. Thanks for reading this far! If you want to see all this in action, take a look at my video and while you are there, take a moment to subscribe.